


Bead Necklace Repair: Save the Beads, Then Fix the Break
To repair a beaded necklace, collect the loose beads first. Photograph the original pattern, then check whether the wire, cord, elastic, or clasp failed. Lay the beads in order on a beading mat. Restring them on material suited to their weight, secure the ends, and gently test the repair before wearing it.
A simple break is often a good DIY project. If the necklace has valuable pearls, fragile gems, or antique parts, pause before taking it apart. A jeweler can help preserve both the beads and the design.
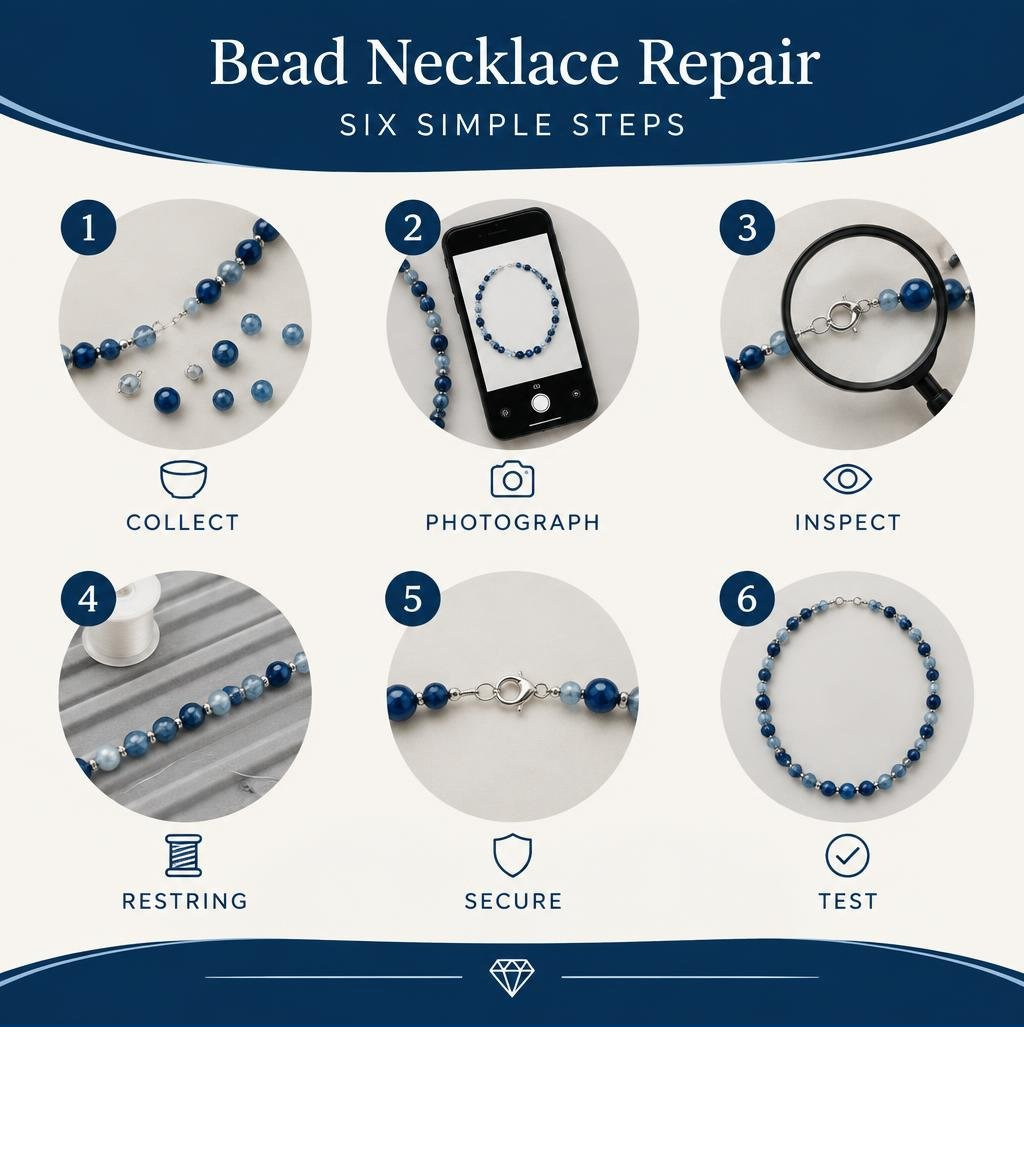
We all have that one small dish on our dresser where cherished jewelry goes to hibernate after a snap or snag. Repairing these pieces honors the Japanese philosophy of mottainai—the idea of respecting objects by extending their lifespan rather than tossing them away. Restringing a favorite piece lets you breathe new life into sentimental treasures so they can be worn with joy for decades to come.
Evaluating Your Jewelry: DIY vs Professional Bead Necklace Repair
Before cutting away old stringing material, take time to evaluate the construction, the type of beads, and the exact point of failure. A snapped beading wire, an overstretched elastic cord, or a fatigued lobster claw clasp each require a distinct approach.
Start by gathering every loose bead you can find. Beads have an uncanny knack for scattering under rugs and furniture! Once you have retrieved them, lay out what remains of the strand and take clear, close-up photos. Documenting the original pattern ensures that alternating colors, graduated stone sizes, and delicate spacer arrangements are not lost during reconstruction.
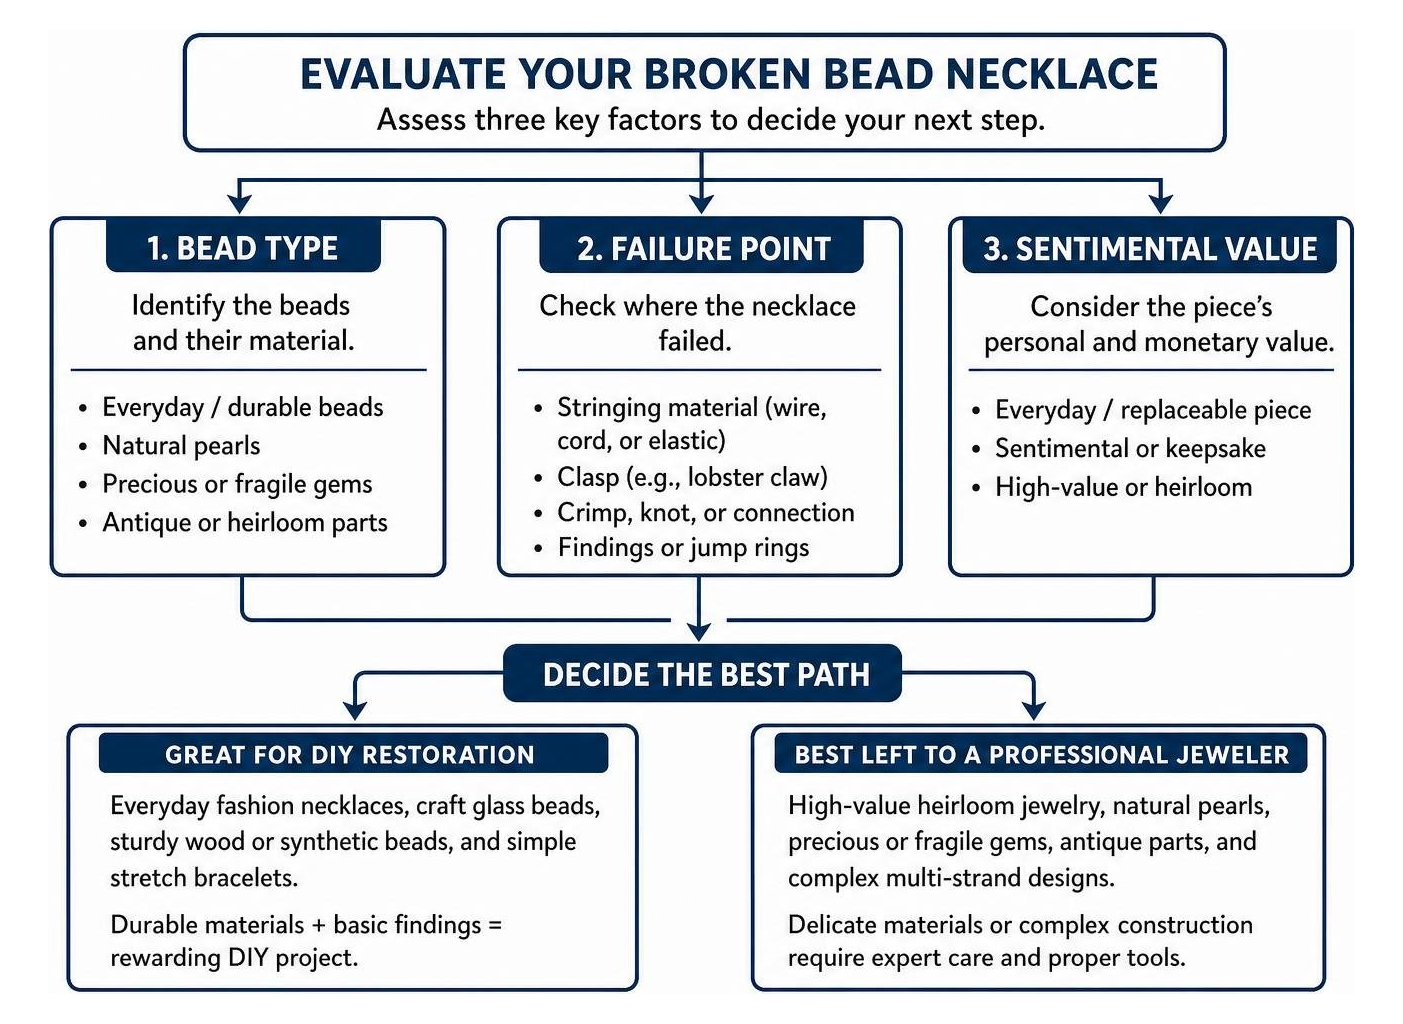
Next, determine whether completing the bead necklace repair at home is the best path forward, or if the piece warrants professional bench work:
- Great for DIY Restoration: Everyday fashion necklaces, craft glass beads, sturdy wood or synthetic beads, and simple stretch bracelets. If the materials are durable and you have the right basic findings, doing it yourself is a rewarding weekend project.
- Best Left to a Professional Jeweler: High-value heirloom jewelry, natural baroque Akoya pearls, antique emeralds, soft porous gems (like turquoise or opal), and complex multi-strand precious metal designs. Natural pearls require individual silk knotting between every single bead to prevent the gems from rubbing against one another and chipping their delicate nacre.
For treasured family heirlooms and valuable gemstones, our master jewelers provide comprehensive repair and restorations in our Campbell, California showroom, backed by over four decades of expertise.
| Repair Category | DIY At-Home Repair | Professional Jeweler Bench Service |
|---|---|---|
| Typical Cost | $10 – $25 (initial tool & material investment) | $22+ (basic restringing); $28–$65+ (pearl knotting) |
| Best Suited For | Everyday glass, crystal, wooden, or stretch beads | Fine pearls, precious gemstones, vintage heirlooms |
| Turnaround Time | 1 to 3 hours of hands-on crafting | Typically 7 to 10 business days |
| Skill Requirement | Basic pliers handling & crimping | Advanced silk knotting, micro-soldering, bench skills |
| Risk Factor | Potential wire fraying if crimped incorrectly | Fully insured, professional workmanship guarantee |
Whether you are performing a quick fix at home using home restringing techniques or dropping off a piece at our workshop, understanding the mechanics of stringing will help keep your entire jewelry collection secure.
Essential Toolkit for At-Home Bead Necklace Repair
Setting up a dedicated workspace prevents missing beads and ensures smooth, consistent tension throughout the repair process.
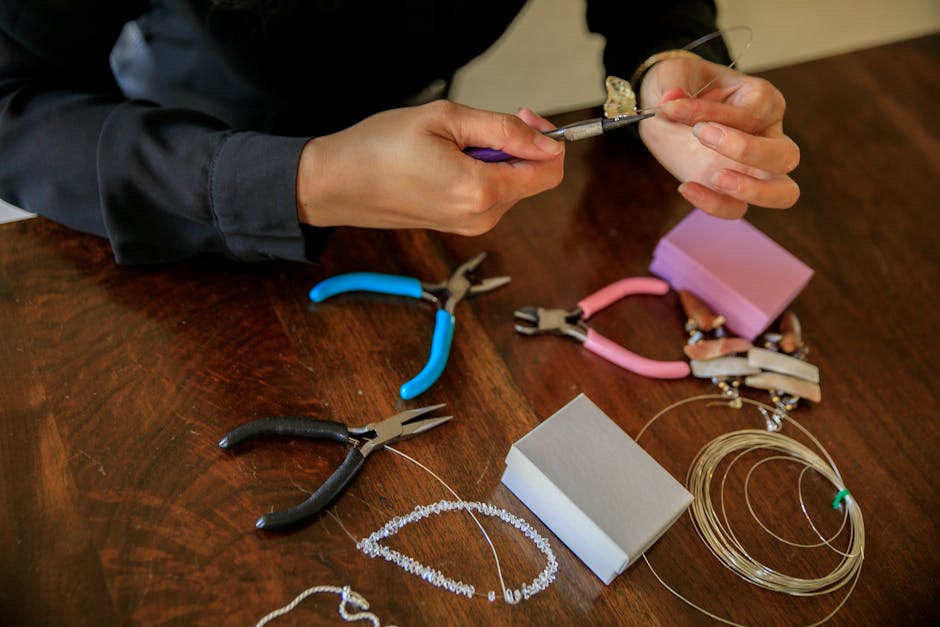
Here are the essential tools and supplies you will need on hand:
- Beading Mat or Board: A velvet or flocked fabric surface with grooved channels keeps round beads from rolling off your work table while you arrange patterns.
- Bead Stoppers (or Painter's Tape): Small spring-loaded clamps that clip onto the tail end of your wire so beads do not slide off while you work.
- Jewelry Flush Cutters: Specialty cutters designed to snip beading wire flush against crimps without leaving sharp, jagged metal tails.
- Chain-Nose Pliers: Smooth-jawed pliers used for opening and closing jump rings and maneuvering tiny components without marring metal plating.
- Dual-Notch Crimping Pliers: A specialized tool featuring two distinct notches—a crescent-shaped notch to fold the crimp tube and a round notch to compress it neatly into a secure bead.
- Seamless Crimp Tubes: High-grade sterling silver, gold-filled, or brass tubes that crush cleanly under crimping pliers to lock wire securely in place.
- Jump Rings and Replacement Clasps: Sturdy connectors to attach clasps, magnetic converters, or extension chains.
Selecting the Right Beading Wire and Stringing Material
Using the wrong stringing material is the most common reason beaded jewelry breaks prematurely. Sewing thread and cheap fishing line are prone to fraying and will quickly snap under the friction of gemstone and glass bead drill holes.
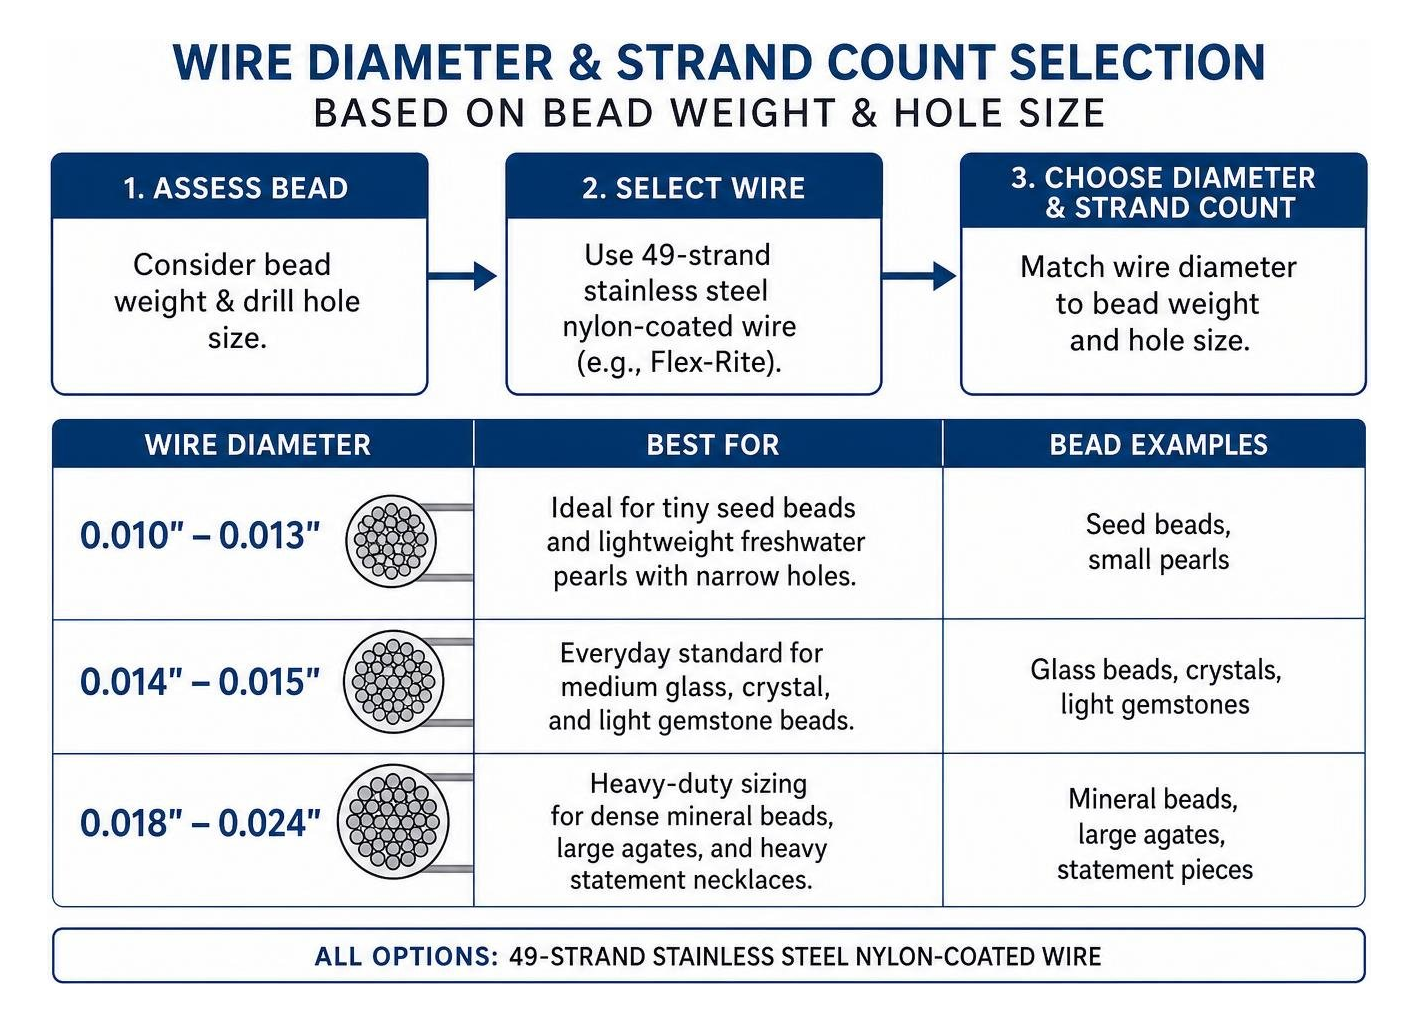
- 49-Strand Stainless Steel Nylon-Coated Wire (e.g., Flex-Rite): Composed of 49 micro-woven stainless steel wires coated in smooth nylon, this material offers unmatched kink resistance, supple drape, and superior tensile strength. It is the gold standard for heavy glass, stone, and metal beads.
-
Wire Diameter Sizing:
- 0.010" – 0.013": Ideal for tiny seed beads and lightweight freshwater pearls with narrow drill holes.
- 0.014" – 0.015": The everyday standard for medium glass, crystal, and light gemstone beads.
- 0.018" – 0.024": Heavy-duty sizing engineered for dense mineral beads, large agates, and heavy statement necklaces.
- Pure Silk Cord: The traditional choice for pearl knotting. Silk provides a soft, fluid drape and cushions fragile nacre, though it requires hand-knotting between each bead.
- High-Strength Synthetic Cord: Threads made from bonded synthetic fibers resist stretching, rotting, and fraying when used on non-abrasive beads.
- Pre-Stretched Elastic Cord (0.7mm – 1.0mm): Essential for stretch bracelets and claspless necklaces. Always stretch the elastic manually several times before stringing to prevent it from sagging after its first wear.
Step-by-Step Restringing: Rebuilding Your Necklace from Scratch
Restringing a necklace from scratch is a relaxing, methodical process. By following a structured workflow, you will achieve balanced tension and a durable finish.
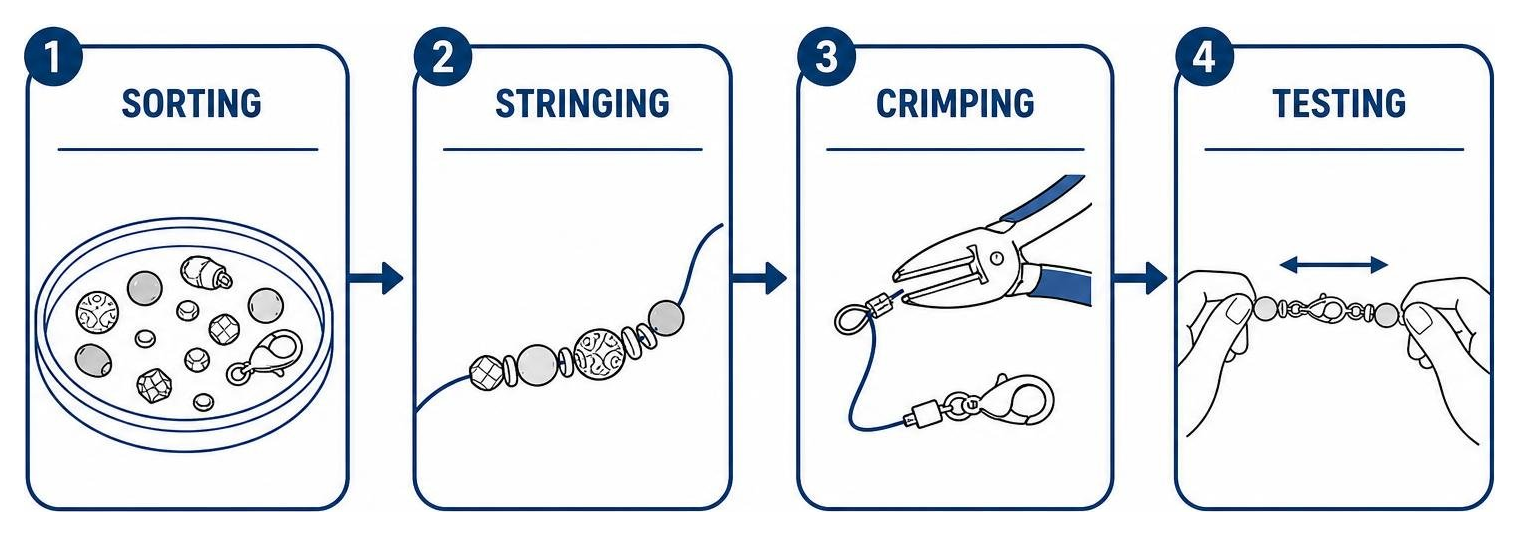
Step 1: Disassemble and Sort
Carefully snip away the frayed wire or rotten thread over your beading board. Slide the beads off into a shallow dish or along the channeled grooves of your layout board. Clean any dust or residue off the beads using a soft, lint-free cloth.
Step 2: Lay Out and Measure
Arrange the beads on your board in the desired sequence. Measure the target length of your necklace. When cutting your new flexible beading wire, add 6 to 8 inches of extra length. This extra wire gives you plenty of room to attach findings and maneuver your crimping pliers comfortably at both ends.
Step 3: Work Off the Spool
Attach a bead stopper or a piece of folded painter's tape roughly 3 inches from one end of your wire. Slide your beads onto the wire in sequence, inspecting each bead hole for sharp burrs or chips as you go.
Precision Crimping and Clasp Replacement Techniques
Securing the clasp is where most DIY repairs succeed or fail. Mastering the two-step crimping technique ensures your necklace stays intact under daily wear, aligning with proven DIY bead repair best practices.
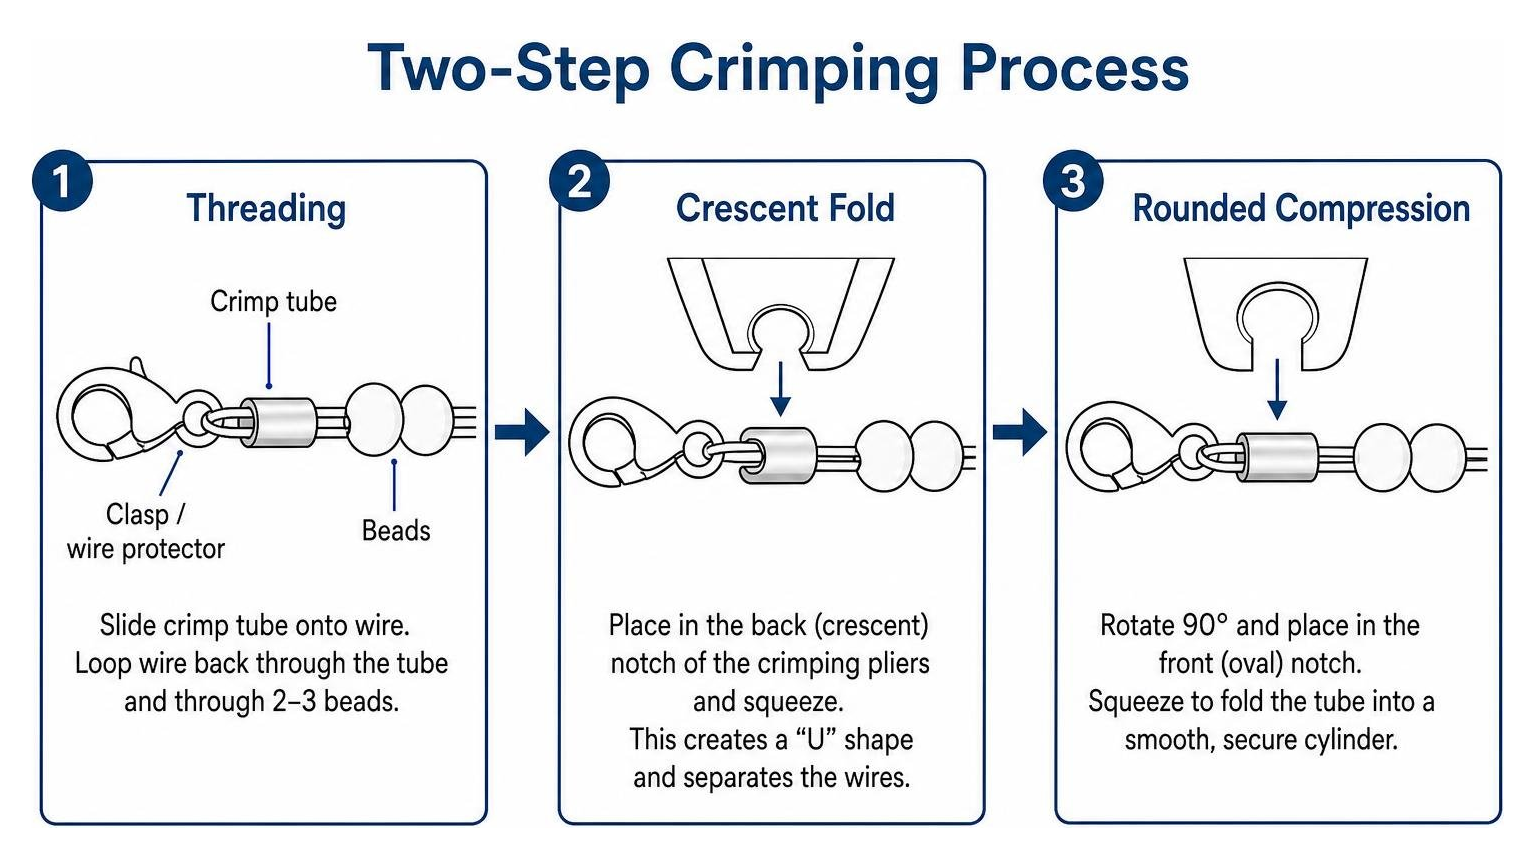
- Thread the First Side: Slide a seamless crimp tube onto the wire, followed by a wire protector (or a small jump ring/clasp). Loop the wire back down through the crimp tube and through the first 2 to 3 adjacent beads.
- Position the Crimp: Bring the crimp tube close to the clasp loop, leaving about 1 millimeter of wiggle room so the clasp moves freely without binding.
- The Crescent Fold (First Notch): Place the crimp tube into the back (crescent-shaped) notch of your crimping pliers. Squeeze firmly. This crimp creates a distinct "U" or "C" shape, separating the two parallel wire strands inside.
- The Final Compression (Front Notch): Rotate the folded crimp 90 degrees and place it into the front (oval/round) notch of the pliers. Squeeze firmly to fold the tube over into a smooth, compact cylinder.
- String Beads and Repeat on Opposite End: Slide all remaining beads snug against the first crimped end. Repeat the crimping sequence on the opposite end, ensuring the beads are seated smoothly without being compressed so tightly that the necklace becomes stiff.
- Snip Excess Wire: Using flush cutters, clip the wire tail flush against the bead exit point. Gently tug along the entire strand to verify that the crimps do not slip.
Converting Traditional Clasps to Magnetic Closures
If tiny spring rings or stiff lobster clasps have become difficult to manage, converting your necklace to a magnetic closure is an easy, practical upgrade.

- Select Quality Magnets: Choose neodymium jewelry magnets encased in sterling silver or gold-plated brass. For heavy gemstone necklaces, select locking or barrel-twist magnetic clasps that prevent the necklace from releasing if caught on clothing.
- Attach via Heavy-Duty Jump Rings: Instead of crimping the wire directly onto the magnet's loops, connect the magnet using solid split rings or soldered jump rings. This setup isolates the magnetic pull from the flexible wire, preventing metal fatigue at the connection point.
- Check Balance and Pull: Fasten and unfasten the magnet several times to confirm that the closure holds the full weight of the necklace securely.
Fixing Elastic Cords and Handling Missing Beads
Elastic necklaces and bracelets offer fantastic convenience, but standard elastic cord degrades over time from skin oils, body heat, and UV exposure.
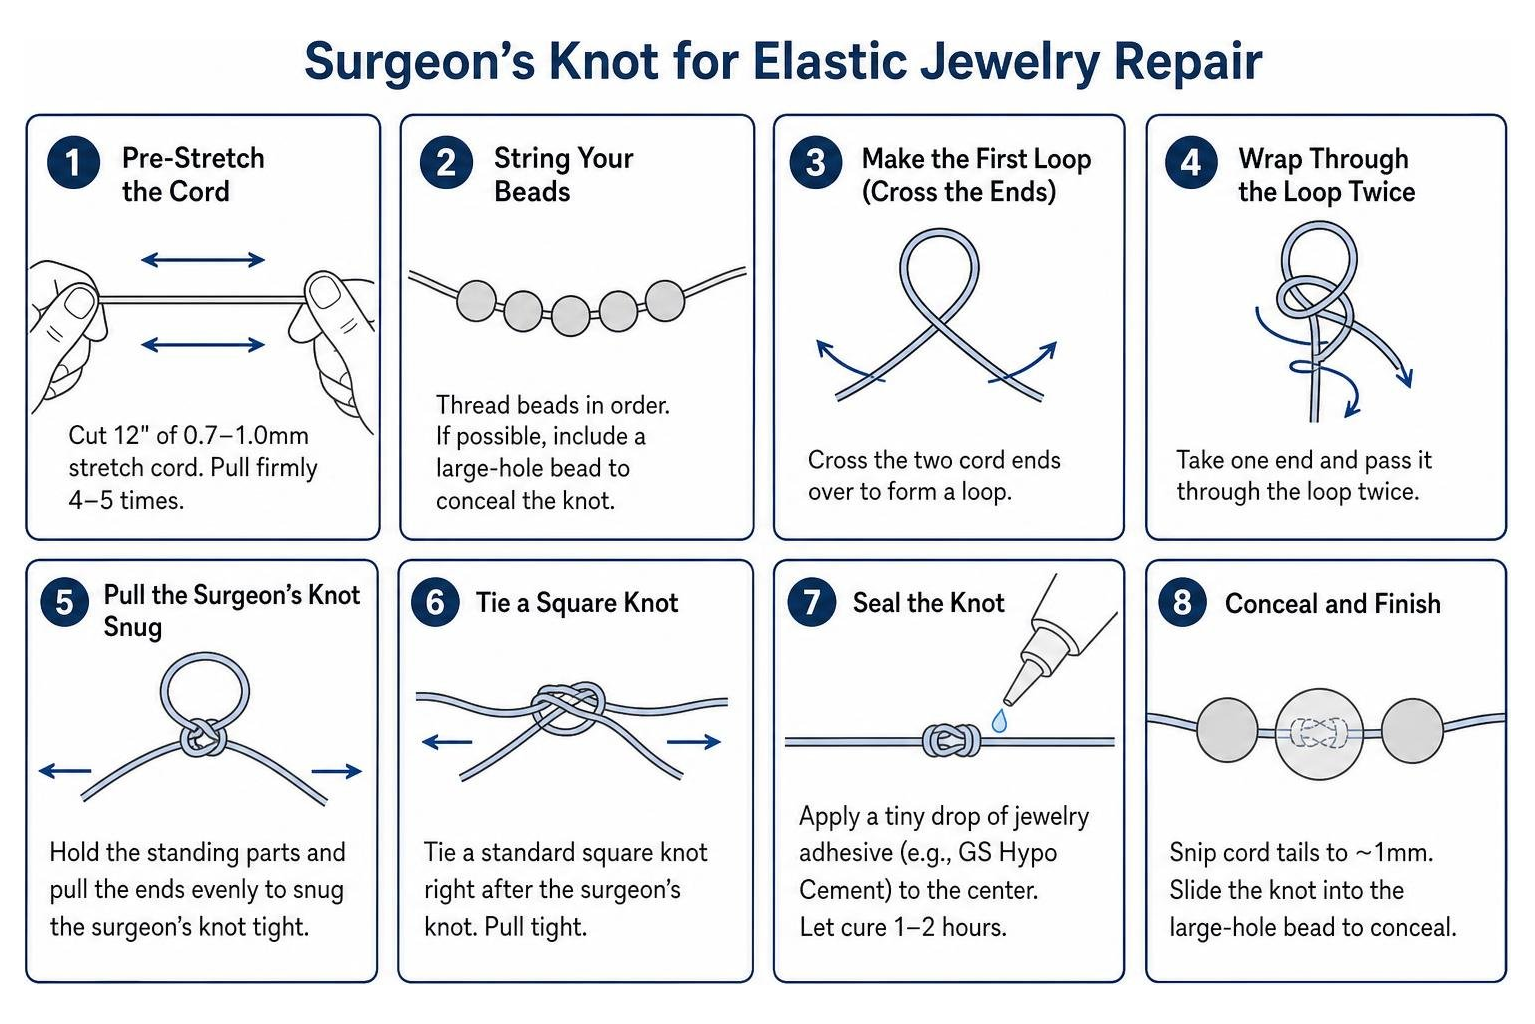
To repair an elastic strand so it lasts:
- Pre-Stretch the Cord: Cut a 12-inch length of 0.7mm or 1.0mm high-grade stretch cord. Pull it firmly between your fingers 4 to 5 times. Pre-stretching prevents the cord from loosening and showing gaps between beads after you wear it.
- String Your Beads: Thread the beads in order. If possible, ensure that one bead on the strand has a hole large enough to conceal a small knot.
- Tie a Surgeon's Knot: Cross the two cord ends over, wrap one end through the loop twice (instead of once like a standard overhand knot), and pull it snug. Follow with a standard square knot pulled tight.
- Seal and Conceal: Apply a tiny pinpoint drop of specialized jewelry adhesive (such as GS Hypo Cement) directly to the center of the knot. Allow the glue to cure fully for 1 to 2 hours. Once dry, snip the cord tails to about 1mm and slide the knot inside an adjacent large-hole bead.
Handling Pearl and Gemstone Bead Necklace Repair
Natural pearls and faceted gemstones require special handling during restoration. Unlike glass or synthetic beads, their chemical composition and drill holes can be fragile and abrasive.
- Individual Knotting: Pearls should always be strung on pure silk or high-tensile synthetic cord with an individual knot placed between each pearl. If the strand ever breaks, only a single pearl can slip free. The knots also prevent the delicate nacre surfaces from scratching one another.
- Using French Wire (Gimp): At the clasp connection, professional jewelers route the thread through fine coiled metal wire known as gimp or French wire. This coil protects delicate silk threads from friction caused by the metal clasp ring.
- Managing Abrasive Gemstone Drill Holes: Mineral gemstones (such as quartz, tourmaline, or lapis lazuli) often have sharp, unpolished drill hole edges. When stringing these stones, always use multi-strand stainless steel wire (like 49-strand Flex-Rite) rather than thread to prevent the stone edges from severing the core.
Creative Solutions for Missing or Damaged Beads
It is common to discover that a few beads broke or went missing when a necklace snapped. Rather than retiring the piece, use these creative solutions to restore balance:
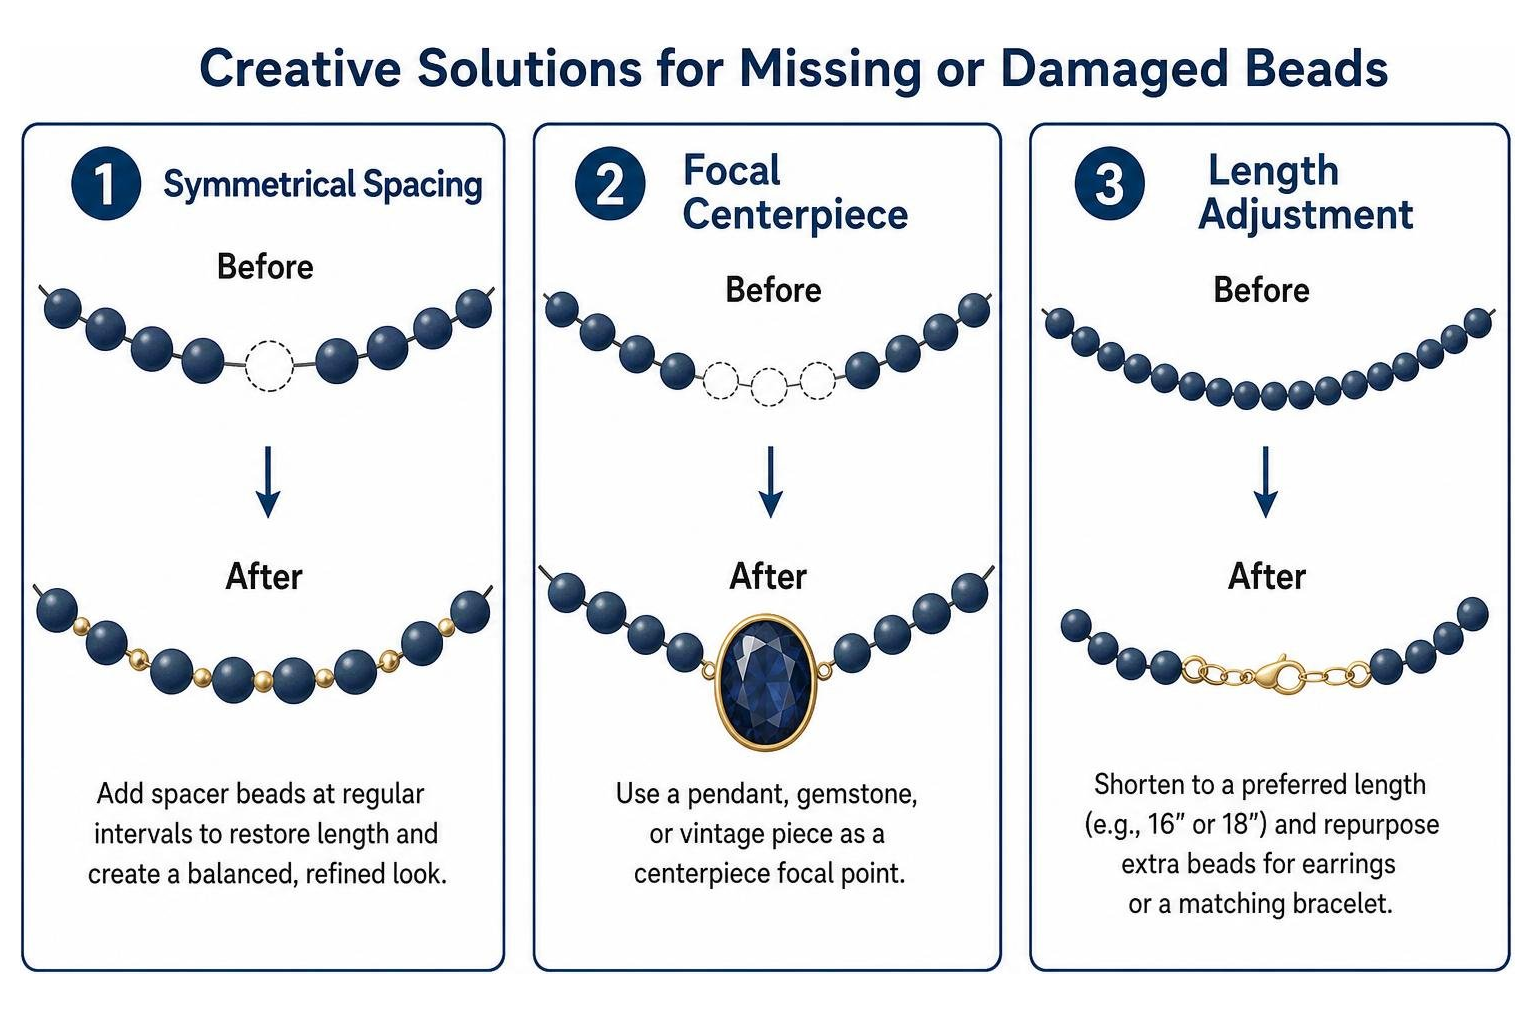
- Symmetrical Spacers: Add polished gold, silver, or gemstone spacer beads at regular intervals along the strand. This subtle adjustment restores the original length while introducing an intentional, refined accent.
- Convert to a Focal Centerpiece: If you lost multiple center beads, group your remaining matching beads along the sides and install a single larger gemstone, pendant, or vintage brooch in the center.
- Adjust the Finished Length: Shorten a 20-inch necklace into a classic 16-inch or 18-inch collar or choker style. You can also repurpose leftover beads into a matching pair of drop earrings or a coordinating bracelet.
Restoring Tarnished Findings and Preventing Future Snaps
Before assembling your necklace, take a moment to clean and restore your original metal clasps, bead caps, and decorative spacers.
Cleaning Metal Components
If your clasps and spacer beads are solid sterling silver or gold-filled, you can easily remove surface oxidation:
- The Aluminum Foil Bath (for Plain Metal Only): Line a glass bowl with aluminum foil, shiny side up. Add 1 tablespoon of washing soda and 1 cup of hot (not boiling) water. Place tarnished silver findings directly onto the foil for 1 to 2 minutes. The electrochemical reaction transfers sulfur from the silver onto the foil, instantly clearing away tarnish.
- Crucial Safety Precaution: Never expose pearls, opals, turquoise, lapis lazuli, or glued components to chemical dips or washing soda solutions. The alkalinity can strip pearl luster and ruin porous gemstones.
- Jeweler's Rouge Polishing Cloth: For delicate pieces, a dual-ply microfiber jewelry polishing cloth treated with jeweler's rouge safely restores high polish without liquids or chemicals.
To keep your fine jewelry and delicate gemstone strands looking their best, explore our guide on professional jewelry care and cleaning.
Best Practices to Prevent Future Breakage
- Apply Cosmetics First: Perfumes, hairsprays, body lotions, and sunscreens contain alcohol and acids that weaken beading cord and erode pearl nacre. Always make your jewelry the absolute last item you put on in the morning and the first thing you take off at night.
- Store Strands Flat: Heavy gemstone and bead necklaces should be stored flat in a fabric-lined jewelry box or soft velvet pouch. Storing them on hanging racks places continuous downward tension on the cord, causing premature stretching.
- Never Wear in Water: Always remove beaded jewelry before showering, swimming, or exercising. Chlorine, saltwater, and tap minerals break down elastic polymers, nylon coatings, and natural silk cords over time.
Frequently Asked Questions About Bead Restringing
What wire is best for repairing heavy glass or gemstone bead necklaces?
A 49-strand nylon-coated stainless steel beading wire (such as Flex-Rite in 0.018" or 0.024" diameter) is the best choice for heavy stone or glass pieces. The 49 woven micro-strands provide high tensile strength, exceptional kink resistance, and a natural, fluid drape that withstands abrasive bead drill holes.
How do I fix an elastic bead necklace that has stretched out or broken?
Remove the old cord completely. Cut a 12-inch piece of 0.7mm to 1.0mm high-grade stretch cord and pre-stretch it firmly 4 to 5 times. Restring your beads, secure the ends using a surgeon's knot followed by a square knot, apply a tiny drop of GS Hypo Cement to the knot core, and tuck the trimmed knot inside a large-hole bead once cured.
Can I use standard flat-nose pliers to crush crimp beads?
While standard flat-nose pliers can flatten a crimp, they crush the metal flat and create sharp, jagged side wings that can abrade your skin and sever the internal beading wire. Dedicated dual-notch crimping pliers create a clean, rounded, structural fold that holds the wire securely without damaging it.
Conclusion
Restoring a broken beaded necklace is a satisfying way to preserve sentimental memories and practice mindful craftsmanship. With the right tools, quality 49-strand wire, and proper crimping techniques, you can make your favorite pieces stronger and more beautiful than the day you bought them.
When dealing with irreplaceable family heirlooms, natural pearls, or high-value gemstones, our master bench jewelers in Campbell, California are here to help. With more than 40 years of trusted experience, a full suite of custom design and restoration services, and a lifetime craftsmanship warranty, Geoffrey's Diamonds Campbell ensures your finest pieces are preserved for generations to come.
If you are located in the South Bay area, stop by our showroom or visit our dedicated page for expert jewelry repair in San Jose to speak directly with our restoration specialists today.