


Fix a Necklace Clasp Before Replacing the Chain
To fix necklace clasp problems, first identify what failed: a dirty or stuck latch, a bent jump ring, or a weak internal spring. Clean the mechanism, check that connecting rings close tightly, and gently test the latch. If the clasp will not spring shut or feels loose, replace the clasp or have the tiny internal spring repaired when the finding is worth preserving.
Most everyday clasp repairs need only two pliers, a matching jump ring, and a replacement clasp. Work over a clean, well-lit surface so small parts cannot roll away. Avoid pulling a jump ring open; twist its ends sideways, then twist them back into alignment for a stronger closure.
A broken clasp does not usually mean the necklace is finished. A careful repair can restore a favorite chain, reduce waste, and keep an important piece wearable.
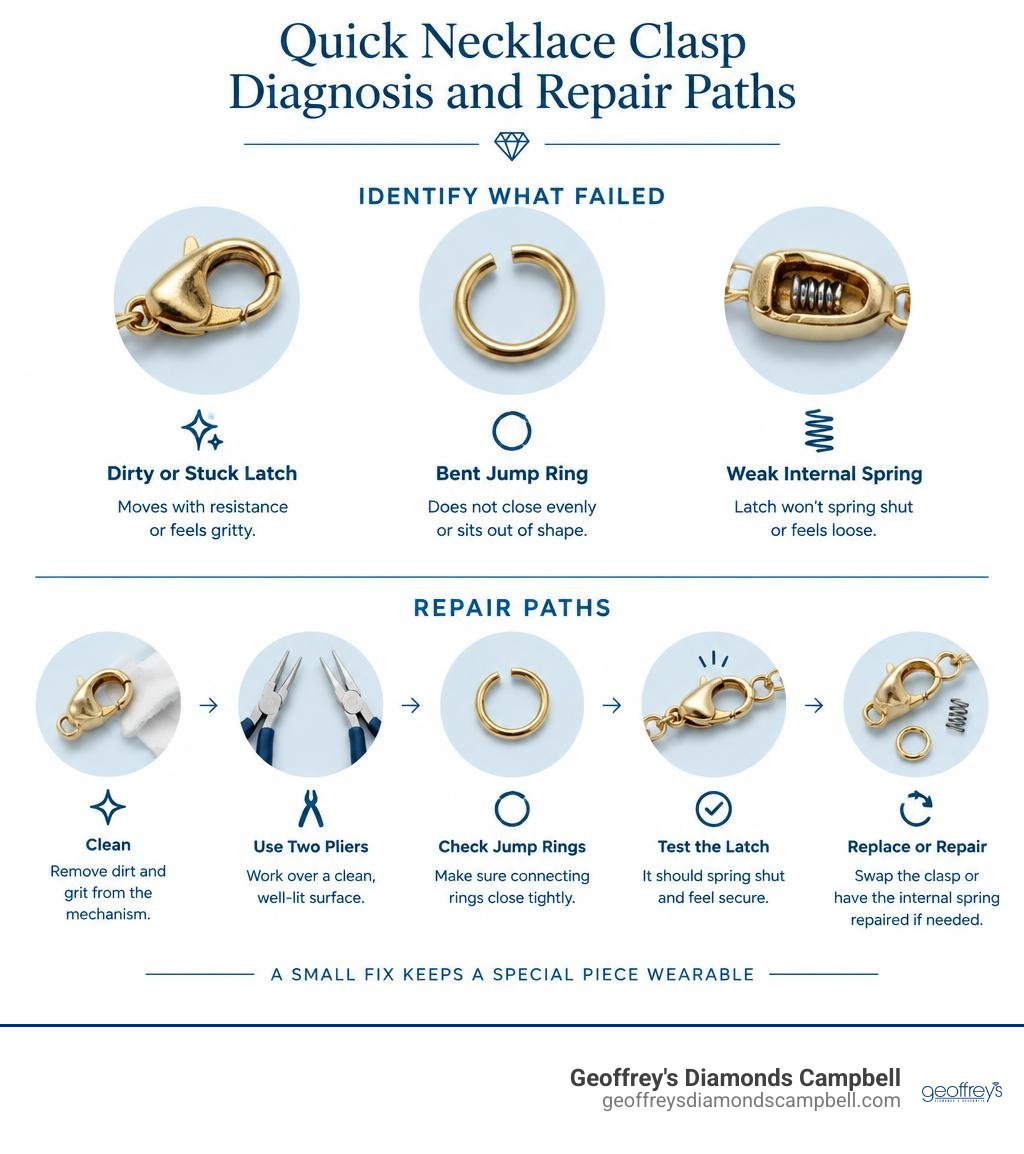
Common Causes of Clasp Failure and How to Diagnose Them
Necklace clasps endure continuous stress throughout their lifespan. Every time you fasten, unfasten, adjust, or accidentally tug your jewelry, mechanical forces act directly on miniature metal components. Understanding why a clasp stops working is the first step toward choosing the correct fix.

Clasp failures generally stem from four primary issues:
- Metal Fatigue: Repeated flexing weakens tiny metal latches and internal coils over months and years of wear.
- Dirt, Lotions, and Debris Accumulation: Residue from skin oils, soaps, hairsprays, and perfumes migrates into mechanical cavities, gumming up moving parts.
- Corrosion and Oxidation: Exposure to chlorinated pools, ocean water, or high humidity corrodes base metals and degrades internal steel springs.
- Jump Ring Separation: Lateral tension pulls open the circular connector loops linking the clasp body to the necklace chain.
To diagnose a loose or unresponsive latch, begin by inspecting the piece under good lighting. Check whether the moving trigger glides freely or catches on metal burrs. If the latch moves smoothly when pushed manually but fails to snap back into its sealed resting position, you are dealing with a compromised internal spring.
Identifying Spring Mechanism Failure in Jewelry Clasps
Standard lobster claws and spring rings rely on a microscopic internal coil spring to push the latch or sliding tongue shut. When this spring loses mechanical tension or snaps entirely, the clasp remains stuck in an open or loosely dangling position.
To test your clasp mechanism:
- The Resistance Check: Using your fingernail or a wooden toothpick, push back the clasp lever. Do you feel crisp resistance, or does the lever yield with zero pushback?
- The Return Test: Release the lever suddenly. A healthy spring snaps the tongue firmly shut against the opposing rim. If the arm creeps back slowly or stays open, the internal spring has failed.
- The Gap Inspection: Look closely at the closure seam. If there is a noticeable hairline gap where the latch meets the clasp frame, fine chain links can slip out easily during wear.
Jump Ring Gaps and Structural Deformations
Often, the clasp body itself is completely fine, but the jump ring connecting it to the necklace has pulled open. Jump rings are the small circular wire loops that join findings together.
When chains get snagged on clothing, the jump ring bears the brunt of the pull. If it was not soldered shut, the split seam will widen. Never pull a jump ring open like a wishbone—doing so weakens the metal's structural memory and makes a seamless circle impossible to restore. Instead, grip each side with smooth-jaw pliers and twist the ends laterally past one another, thread your components, and twist back until the ends click flush against each other.
Step-by-Step Guide: How to Fix Necklace Clasp Mechanisms and Springs
Preserving an original finding—especially on antique pieces or high-karat gold heirlooms—reduces material waste and protects the authentic aesthetic of your jewelry. While swapping out an entire clasp is common, repairing the internal mechanism keeps historical findings intact.

Essential Tools Needed to Fix Necklace Clasp Components at Home
Before starting any precision jewelry repair, set up a clean, high-contrast workspace over a soft silicone bead mat to prevent small components from bouncing onto the floor.
Equip yourself with the following:
- Two pairs of needle-nose or chain-nose pliers: Ensure jaws are smooth (non-serrated) so they do not mar precious metals.
- Micro-tip tweezers: Indispensable for manipulating tiny wire coils.
- Jeweler's loupe or magnifying visor: Provides 5x to 10x magnification for inspecting microscopic seams.
- Light mineral oil or jewelry-safe lubricant: For dissolving grit and restoring smooth action to stiff latches.
- Safety glasses: Protects eyes against rogue springs snapping loose.
For basic swaps and open-ring repairs, practical step-by-step references like the Necklace or Bracelet Clasp Replacement guide on iFixit offer helpful visual examples of manual finding adjustments.
How to Replace an Internal Clasp Spring Without Swapping the Whole Finding
Replacing a micro-spring requires patience, steady hands, and magnification:
- Open the Housing: Using fine-tipped tweezers and an ultra-fine probe, locate the retaining tab or sliding tongue track on the clasp frame. Gently ease back the retaining lip just enough to slide the movable latch arm free.
- Remove the Broken Coil: Extract the remnants of the broken, crushed, or rusted internal spring. Clean the interior cavity using a micro-applicator dipped in isopropyl alcohol to remove ancient debris.
- Insert the Replacement Spring: Select a replacement spring that matches the exact gauge and coil diameter of the original cavity. Thread the coil over the internal guide post or nestle it snugly into the housing chamber.
- Seat the Latch Arm: Position the sliding tongue against the compressed spring, pressing inward until the retaining guides line up.
- Reseal the Clasp Arm: Using your smooth-jaw pliers, gently press the retaining tab or lip back into position. Apply light, controlled pressure so you do not crush the outer shell.
- Test the Latch Snap: Actuate the trigger 5 to 10 times to verify consistent spring rebound and absolute closure alignment.
Sourcing Clasp Replacement Springs and Assortments
Professional jewelers and hobbyists source replacement coils from dedicated jewelry findings suppliers, lapidary supply distributors, and wholesale micro-hardware manufacturers.
When purchasing replacement springs:
- Select Stainless Steel Coils: Stainless steel offers superior tensile strength, elasticity, and rust resistance compared to base brass or silver wire springs.
- Invest in Multi-Size Assortments: Micro-spring assortment packs containing inner diameters ranging from 0.8 mm to 2.5 mm ensure you have the exact gauge needed for varying clasp bodies.
- Ensure Metal Compatibility: Confirm that the internal spring size seats flush inside your clasp housing without rubbing against inner walls, which causes premature mechanical abrasion.
Alternatives to Spring Repair: Choosing the Right Replacement Clasp
Micro-spring replacement requires steady fine-motor precision. If the original clasp is crushed, worn thin, or inexpensive, swapping the entire finding for a brand-new clasp is often the fastest, most durable solution.

Comparing Popular Clasp Types: Durability, Ease, and Security
| Clasp Style | Durability Rating | Ease of Fastening | Security Level | Best Suited For |
|---|---|---|---|---|
| Lobster Claw | Very High | Moderate | High | Everyday gold & silver chains, heavy pendants |
| Spring Ring | Moderate | Challenging | Moderate to High | Lightweight chains, delicate aesthetic pieces |
| Magnetic Clasp | Moderate | Very Easy | Moderate (Pulls apart under snagging) | Layered necklaces, individuals with limited dexterity |
| Toggle Clasp | High | Easy | Moderate (Requires continuous chain tension) | Statement necklaces, heavy artisan gemstone strands |
Magnetic clasps are a practical upgrade if you struggle with tiny spring levers. However, magnetic clasps can pull open if caught on a scarf or seatbelt, and exposure to strong heat or years of daily wear can gradually cause demagnetization. For heavy chains carrying sentimental gemstone pendants, mechanical locks like lobster clasps or safety-latched box clasps remain the gold standard for security.
Solderless Clasp Swapping and Crimp Loop Methods
If your necklace broke at the end termination rather than the latch body, you can install a complete replacement clasp without soldering equipment using fold-over crimps or fresh jump rings.
As detailed in the iFixit repair guide on using fold-over end crimps with loops, you can trim damaged wire tips, secure the chain cord inside a fold-over crimp using smooth pliers, and anchor a new jump ring and lobster clasp directly to the loop. This solderless method creates a sturdy, professional connection in just a few minutes.
Extending Clasp Life Through Proper Care and Maintenance
Consistent care prevents premature clasp breakdown, saving you time and avoiding lost jewelry. Metal components wear out fastest when subjected to abrasive debris and harsh chemical exposure.
- Put Jewelry On Last: Apply lotions, cosmetics, and hairsprays before putting on necklaces. Chemical residues form a sticky paste inside clasp springs that attracts grit and corrodes metal.
- Remove Before Water Exposure: Never wear clasps in chlorinated swimming pools, hot tubs, or ocean water. Chlorine causes micro-fractures in low-karat golds and attacks internal steel springs.
- Store Separately in Pouches: Tangled necklaces place lateral torque on clasp arms and bend jump rings. Store each chain fastened inside its own soft pouch or hanging compartment.
- Practice Routine Cleaning: Follow regular guidelines for jewelry care and cleaning by soaking mechanical clasps in warm, mild soapy water every few months, rinsing thoroughly, and drying completely to flush out internal pocket grit.
When to Fix Necklace Clasp Issues Yourself vs. Visiting a Professional
DIY repairs are satisfying and cost-effective for costume jewelry, casual silver chains, or simple open-and-close jump ring swaps. However, valuable and sentimental fine jewelry warrants an experienced bench jeweler.
Take your piece to a jeweler when:
- The chain is composed of solid 14k/18k gold or platinum.
- The jump rings require seamless laser welding or torch soldering to guarantee security.
- The clasp is integrated directly into a strand of valuable hand-knotted pearls.
- The piece is a delicate antique family heirloom where amateur tool marks would diminish its integrity and value.
Our shop provides a full suite of fine jewelry services, where our bench technicians assess structural wear, reinforce thinned loops, and execute seamless repair and restoration work backed by decades of craftsmanship.
Frequently Asked Questions about Necklace Clasp Repair
Can you fix a loose necklace clasp without replacing the entire piece?
Yes. If the issue is simply dirt or residue causing the lever to stick, soaking the finding in warm soapy water and applying a pinpoint droplet of mineral oil often restores spring action. If the tongue is slightly misaligned, gently nudging it straight with smooth-jaw pliers will restore the latch. If the jump ring has a gap, closing it properly resolves the problem immediately.
What is the strongest and most durable replacement clasp for everyday wear?
Lobster claw clasps and heavy-gauge box clasps with secondary safety figure-eight latches provide the strongest everyday protection. Lobster clasps feature thick outer walls that resist lateral crushing and protect the internal spring mechanism from direct impact.
Is it safe to use glue or solder at home to secure a broken clasp?
Never use super glue, craft epoxy, or plumbing solder on fine jewelry. Glues fail under shear tension and leave behind stubborn chemical residues that contaminate precious metal alloys. Soft hardware solder melts at incorrect temperatures and discolors precious metals. Professional jewelers use precision laser welders or jewelry-grade gold and silver solder to create seamless, permanent bonds.
If you have additional questions about maintaining your jewelry or selecting replacement clasps, explore our helpful FAQ page or contact our showroom team directly.
Conclusion
A malfunctioning necklace clasp does not mean you have to retire a beloved chain. By accurately identifying whether the problem lies in an open jump ring, accumulated dirt, or a dead internal spring, you can easily determine whether a quick home adjustment, a finding swap, or a professional bench repair is the best path forward.
For fine gold chains, valuable gemstones, and treasured heirlooms, professional servicing guarantees your jewelry remains completely secure on your neck. At Geoffrey’s Diamonds Campbell, we bring over four decades of fine-jewelry expertise and a dedicated lifetime craftsmanship warranty to every piece we touch. If your favorite chain needs expert attention, visit us for precision jewelry repair in San Jose, CA, and let our master jewelers restore your pieces to pristine condition.